“You can put lipstick on a pig, but it’s still a pig,” said Barack Obama famously in 2008. While it’s hard to disagree, sometimes you are financially stuck with a pig for a couple of years. Sometimes you need a little help looking at said pig in the face every day. Sometimes you just want your pig (master bathroom) to look deceptively glamorous with just a tube of drug store (cheap) lipstick (paint), until you can afford a total facelift (gut). Sometimes you are not a millionaire who can just “order” a perfect Ensuite without putting down your martini like Goldie Hawn in Overboard.
In a perfect world, your biggest pig “issue” would be more like whether to order a BLT or pork medallions whilst on your getaway from all the noisy hammer banging that’s involved in constructing your grand master bathroom suite. But alas, that is not me.
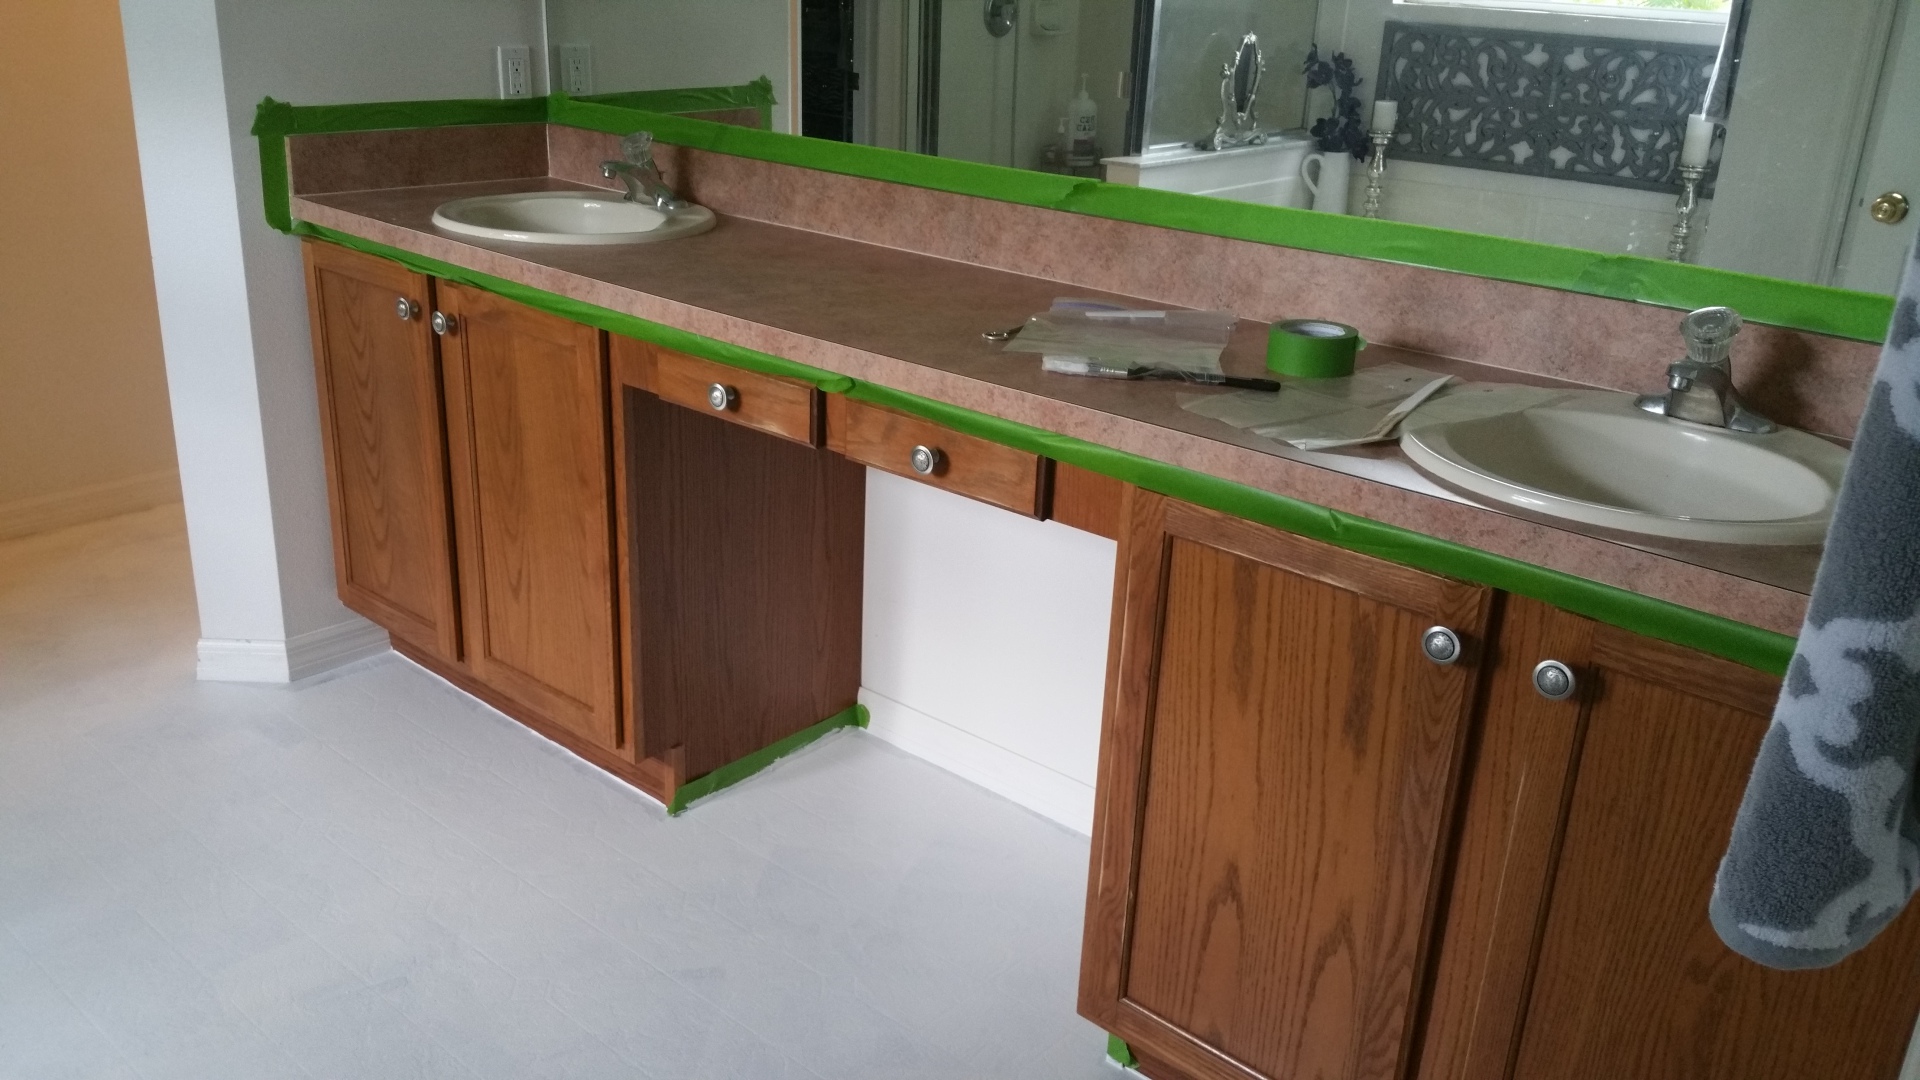
In this two part tutorial I will show you how I transformed my master bathroom “pig” for under $500 with only paint, new light fixtures, new faucet fixtures, and knobs. Here is the before:
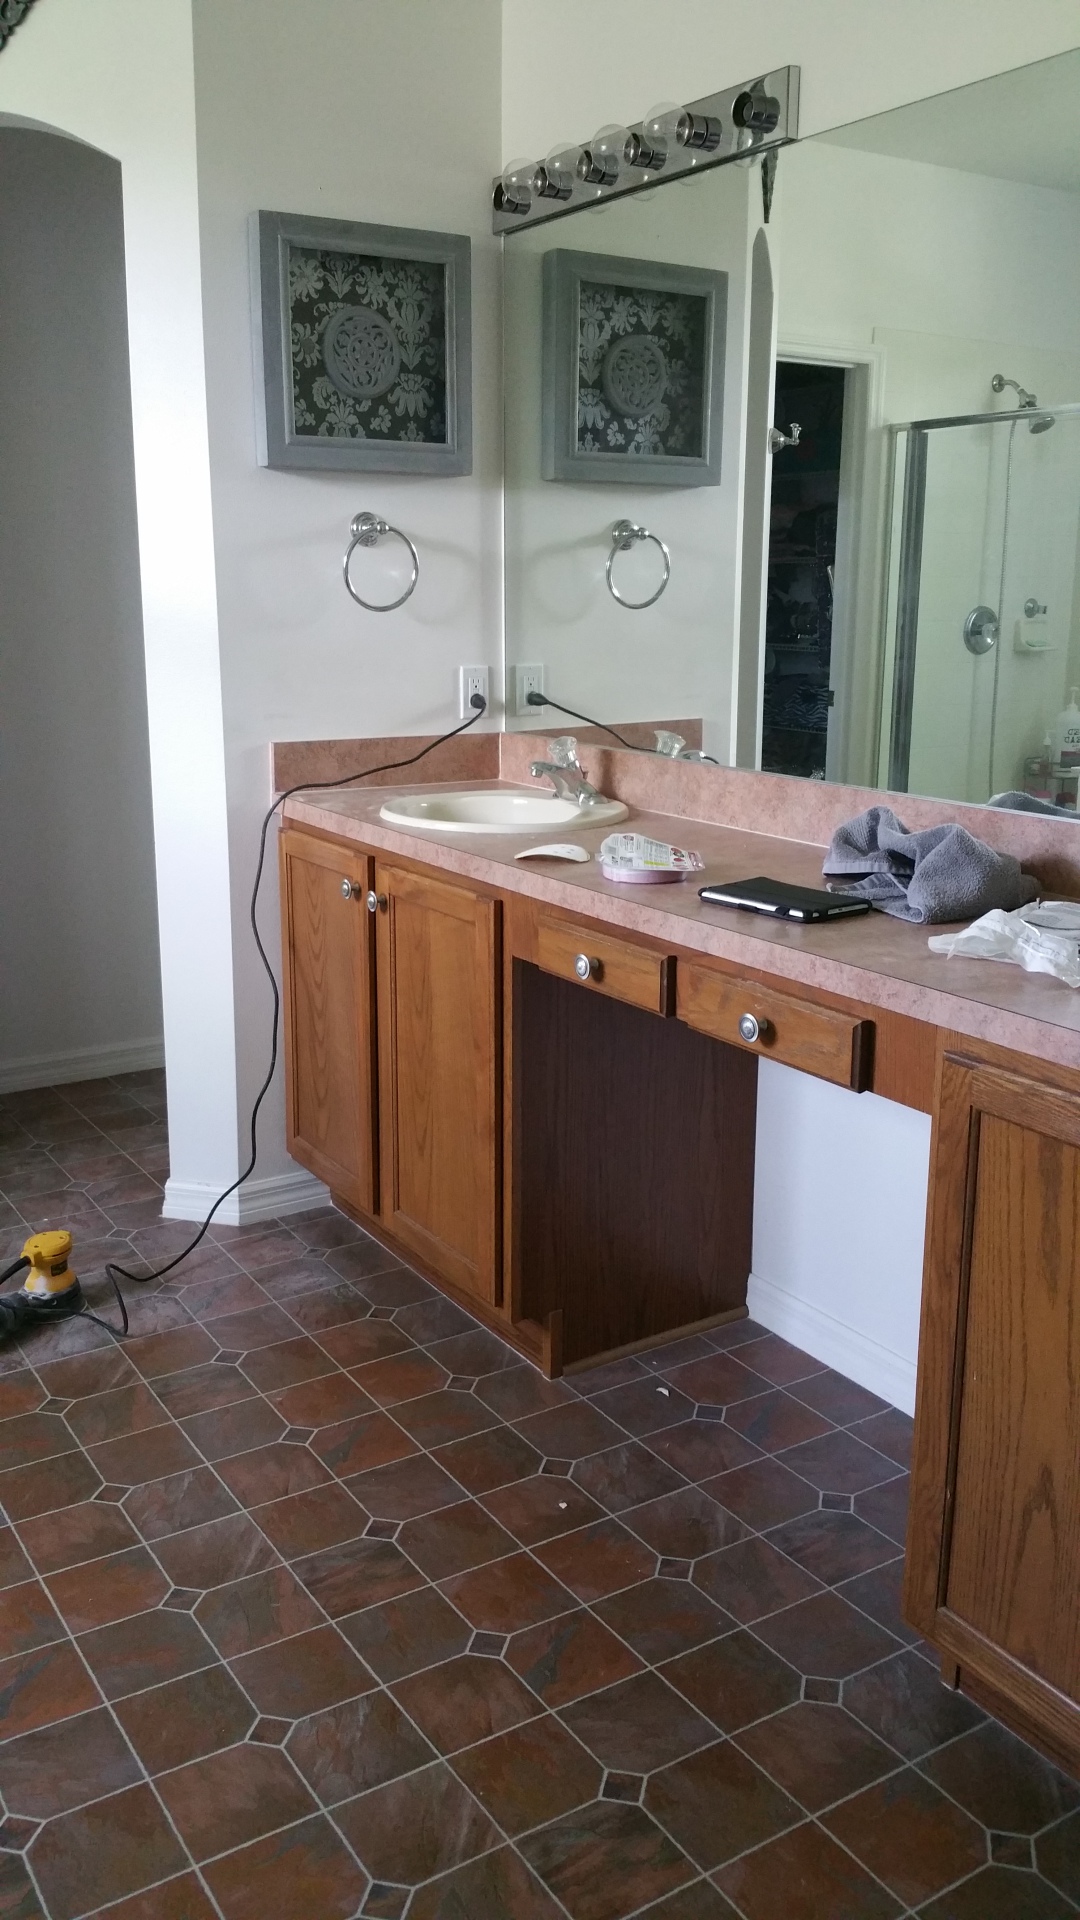
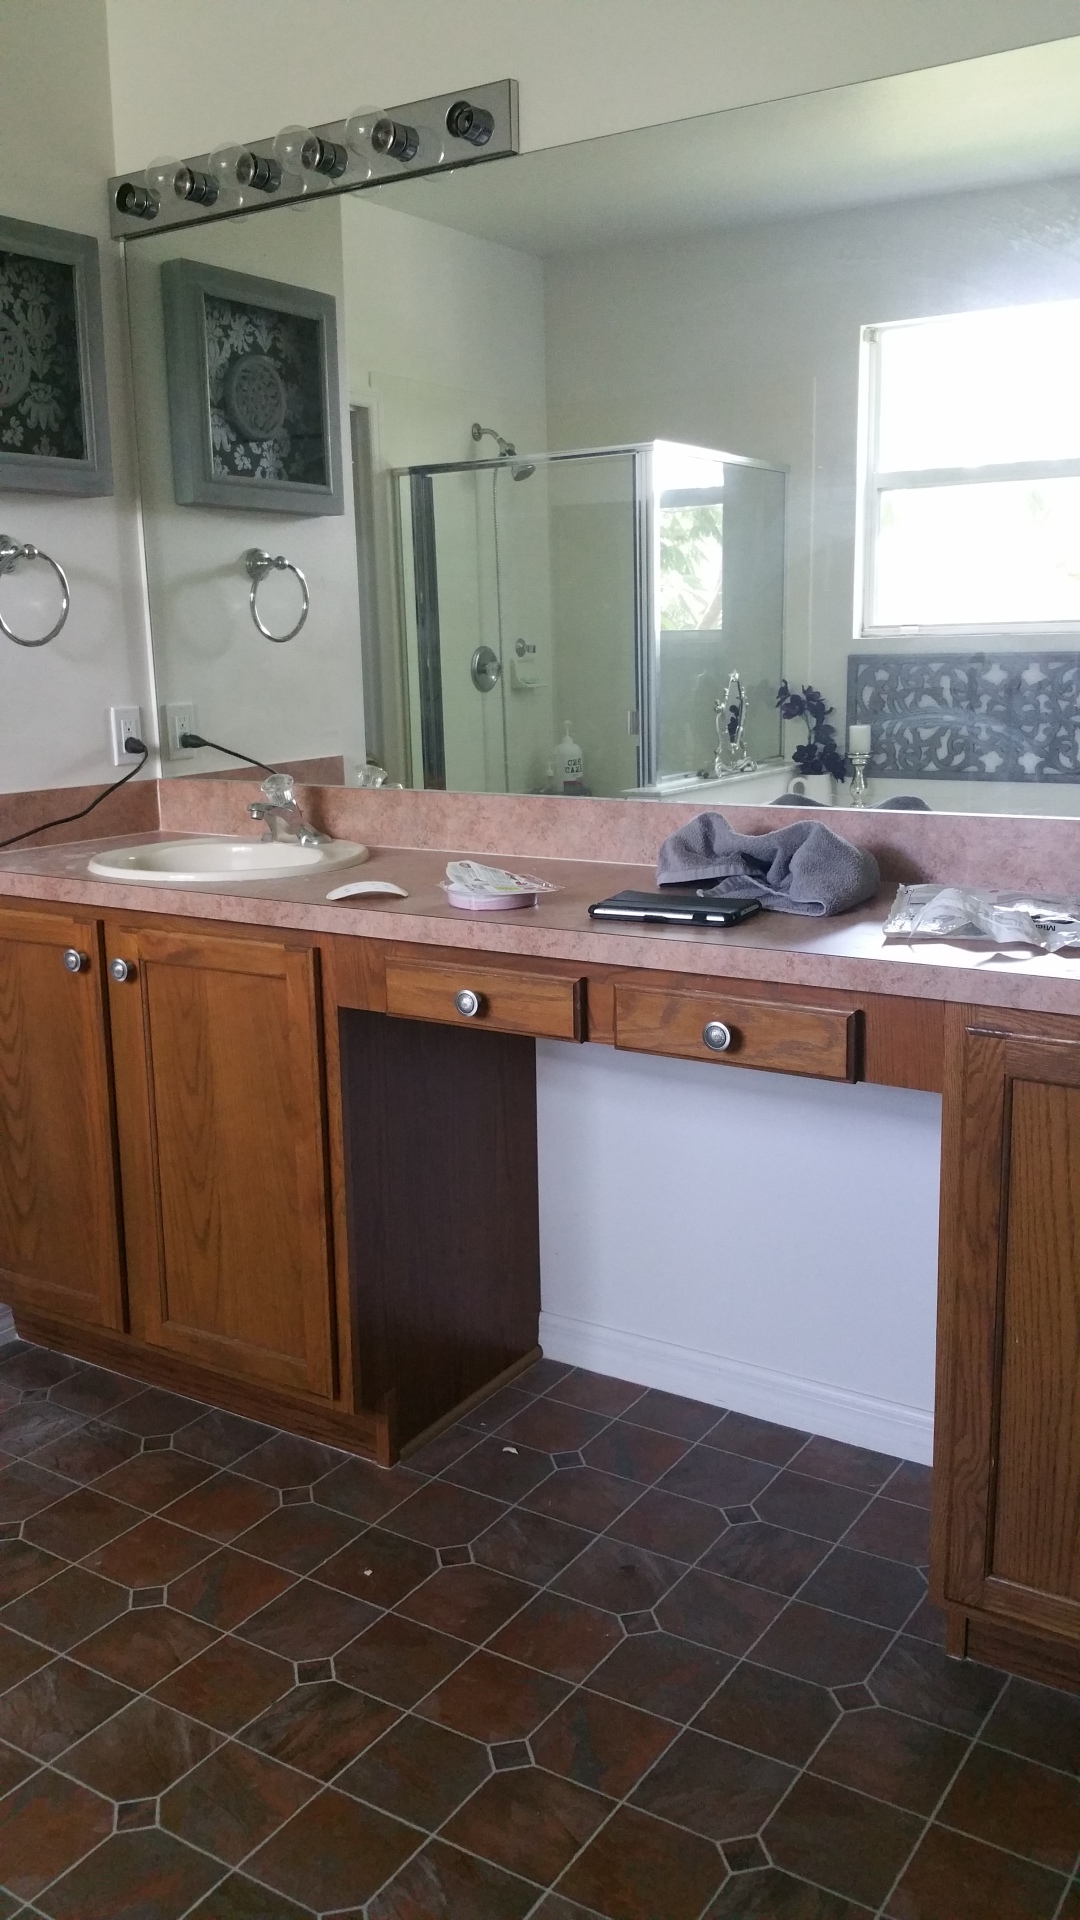
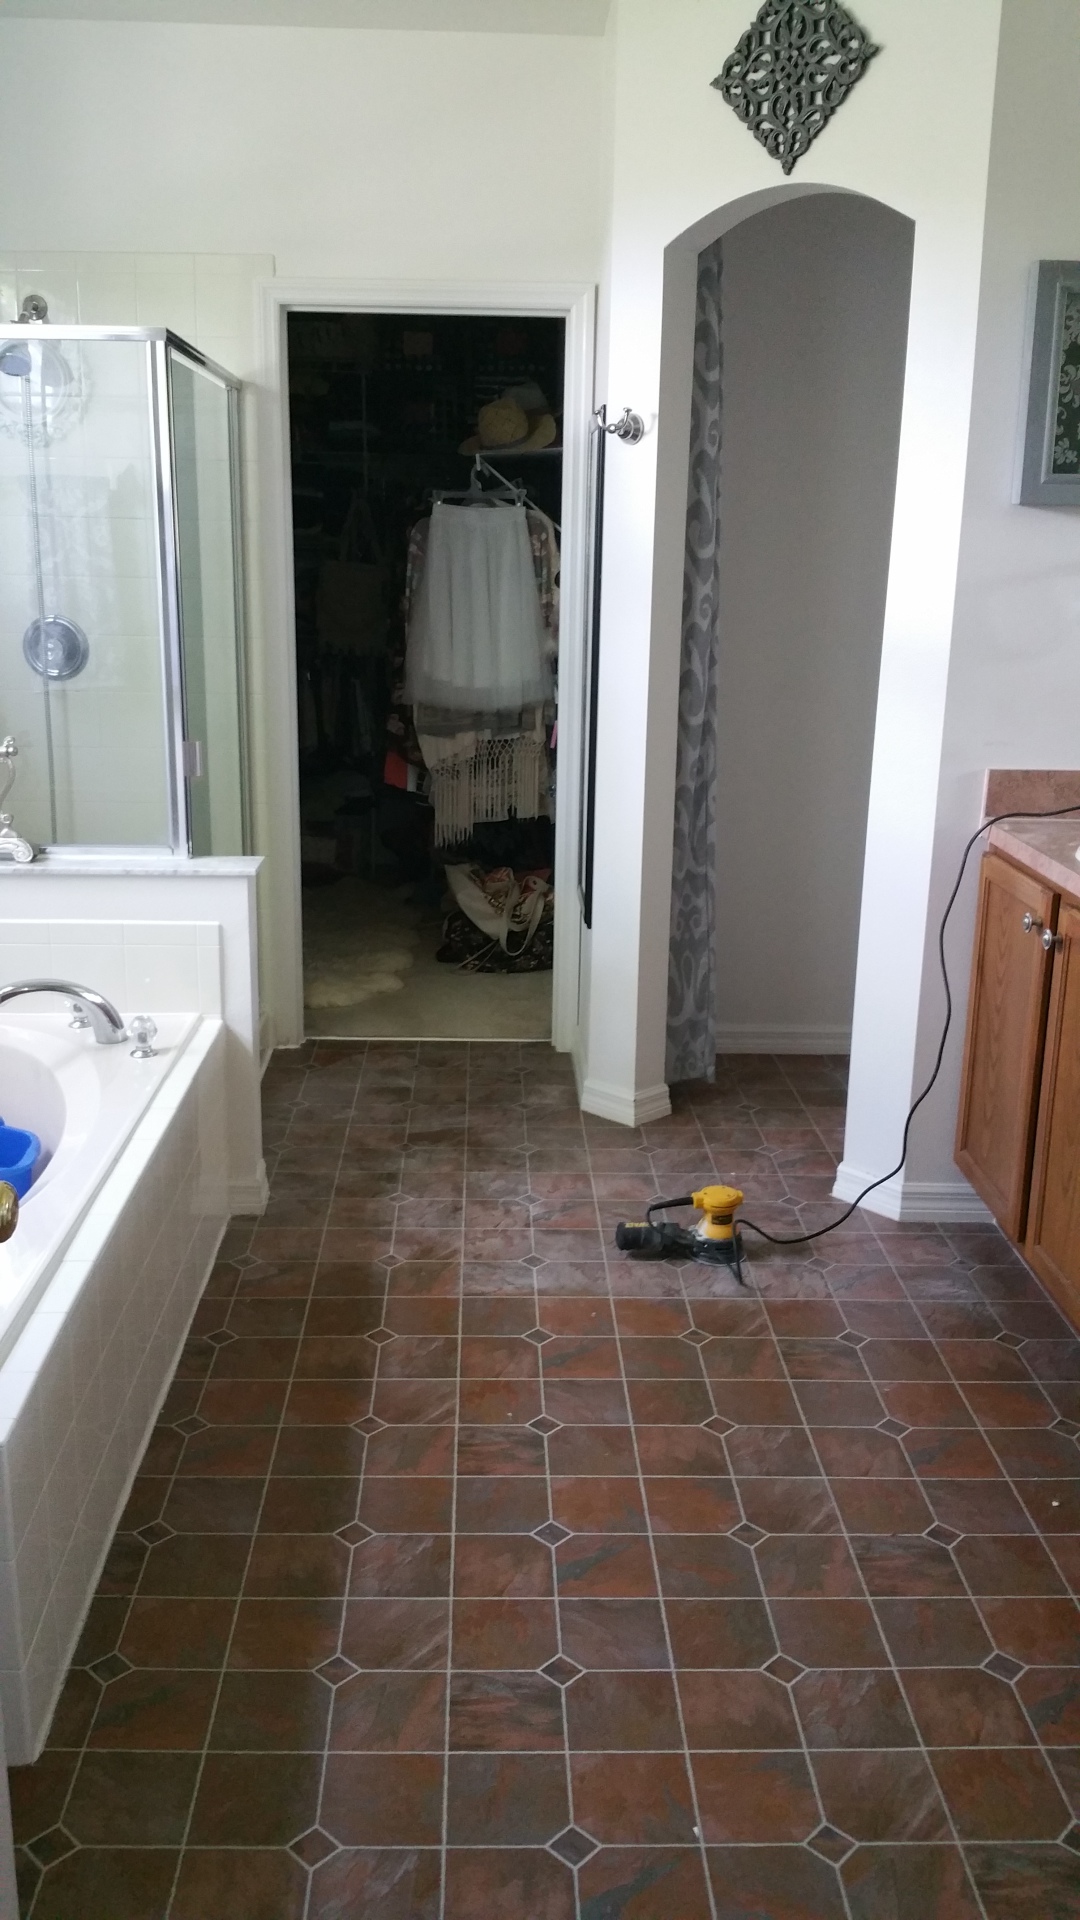
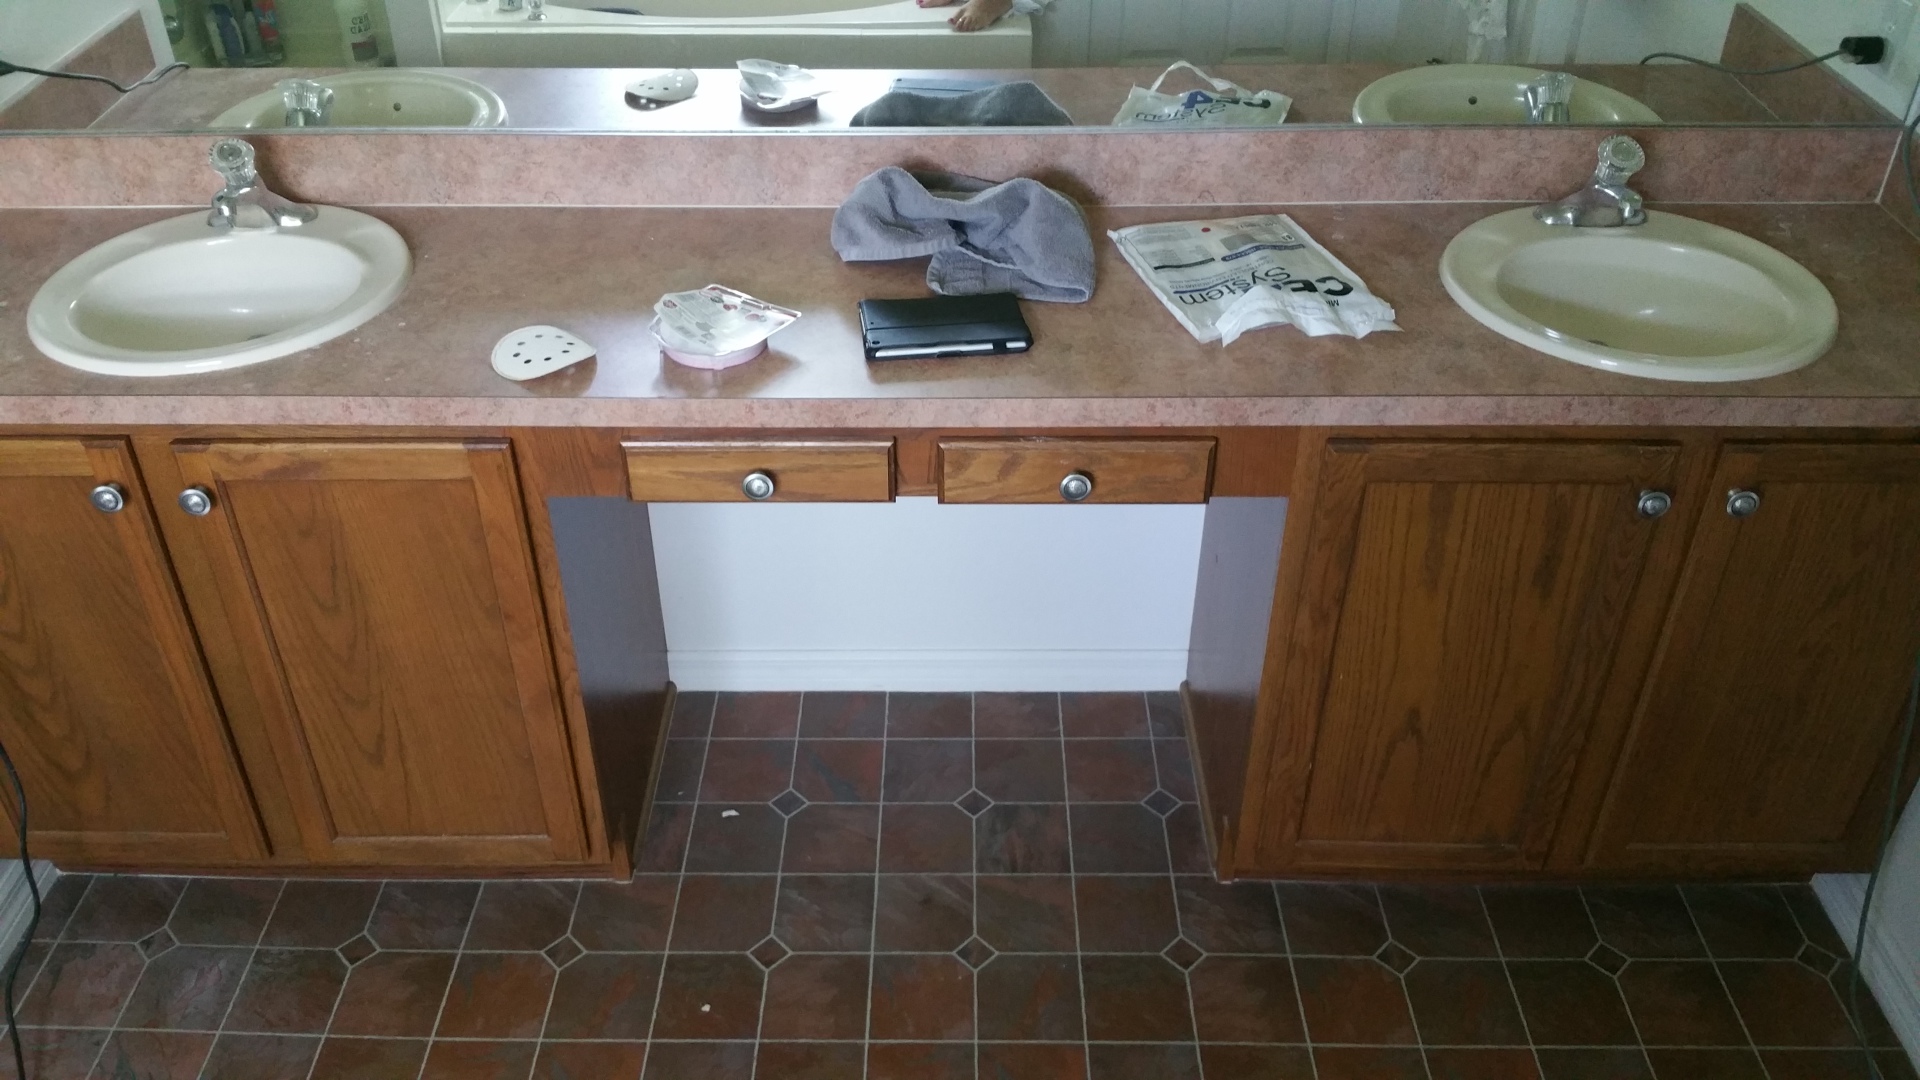
The major fixtures like the bathtub, shower, and sinks are all boring and underwhelming builder grade, but at least in good working condition. But that orange fake slate with grout (?) vinyl floor! And those orange counters! And that brown oak! Orange, orange, orange (and stark white, bleh!) with two 80’s light fixture strips to extra light it all up, in case you couldn’t see all the hideousness in the natural light.
So one day I woke up and decided that I was done feasting on this smorgasbord of eyesores. I decided to paint that floor. Right that minute. Before deciding to paint or change anything else. This is not the way to do it, my friends. Here is the order in which you should update your entire bathroom with paint, should you plan ahead (like I was too carried away to do): 1. Ceiling 2. Walls and light fixtures 3. Cabinets 4. Countertop 5. Faucet fixtures 6. Floors.
For the sake of this tutorial however, I will give it to you like I did it as to not confuse my brain’s internal filing cabinet. Here is what you need to paint your floor:
- Orbital sander: https://amzn.to/2SNPLlf
- TSP substitute- https://amzn.to/2HDqa87
- A bucket to mix the tsp substitute with water
- A stiff bristle brush and/or rags for cleaning
- 1 gallon of primer: https://amzn.to/2HJqja
- 1 gallon of porch and floor paint, I used Valspar oil based porch and floor paint in the color chowder: https://amzn.to/3bYx3im
- Paint brush for edging: https://amzn.to/2HDebHE
- Roller and sponge: https://amzn.to/2v4OAo9
Ok, first things first. As you can see by the above photo, I used my orbital sander to kind of “rough up” the gloss on this vinyl floor. You should know that it was not super glossy to start off with, and that may have positively effected it’s ability to really hold on to the paint. Also, it has a texture to it because it was made to look like slate. I just proceeded like I was painting a non-textured surface. I did this project 14 months ago and it has held up beautifully.
Next get it CLEAN. Fill up your bucket with your tsp and water according to the directions on the bottle, dunk your brush and scrub the floor like you’re going to perform surgery on it. Once you’re done, do it again. You cannot possibly get this floor too clean. Body oils, hairspray, and makeup build up over time and your paint will not stick if these things are present. If you have cleaned it 10 times but still feel a hairspray residue, you are not finished yet (and you may need a different product to help you out). I’m sorry to tell you, but this also means you must get closer to your toilet than you have since your 21st birthday. Especially if you have boys in the house.
After you are clean, you must prime. I used oil based primer and oil based paint. There’s a lot of mixed opinions out there on whether oil based is better or not, but like I mentioned before, it is holding up like a champ so I will endorse the performance of the oil based variety. If you’ve never painted a floor before you are in for a treat because it is easier than painting a wall. First, you “edge” all around the perimeter like you do a wall, then you dump the paint directly on the floor and roll it out towards the escape. Easy peasy!
NOTE: I can’t lie to you, oil based paint has a horrible suffocating odor that lasts long after you are walking on it, so I would take that into consideration if doing this near a child’s sleeping place. I, on the other hand, got cozy with the potentially cancer causing aroma since the bathroom is attached to my bedroom and I did not think of this beforehand.
I primed the floor twice. It may occur to you to place a fan near the floor to help the drying process along, as it did to me. DO NOT PLACE A FAN ON IT or you will succeed in blowing dirt, dust, and dog hair from the fan and the adjoining room into your fresh paint. Just leave it be and it will dry on its own like paint generally does. Carefully crawling on your freshly primed floor and picking out the crap that blew into it will seriously impede your progress on this project and will not cause you a fun time. On the bright side of things, 2 coats of primer are always better than one and as an unintended consequence, may have helped my floor in wearing so well.
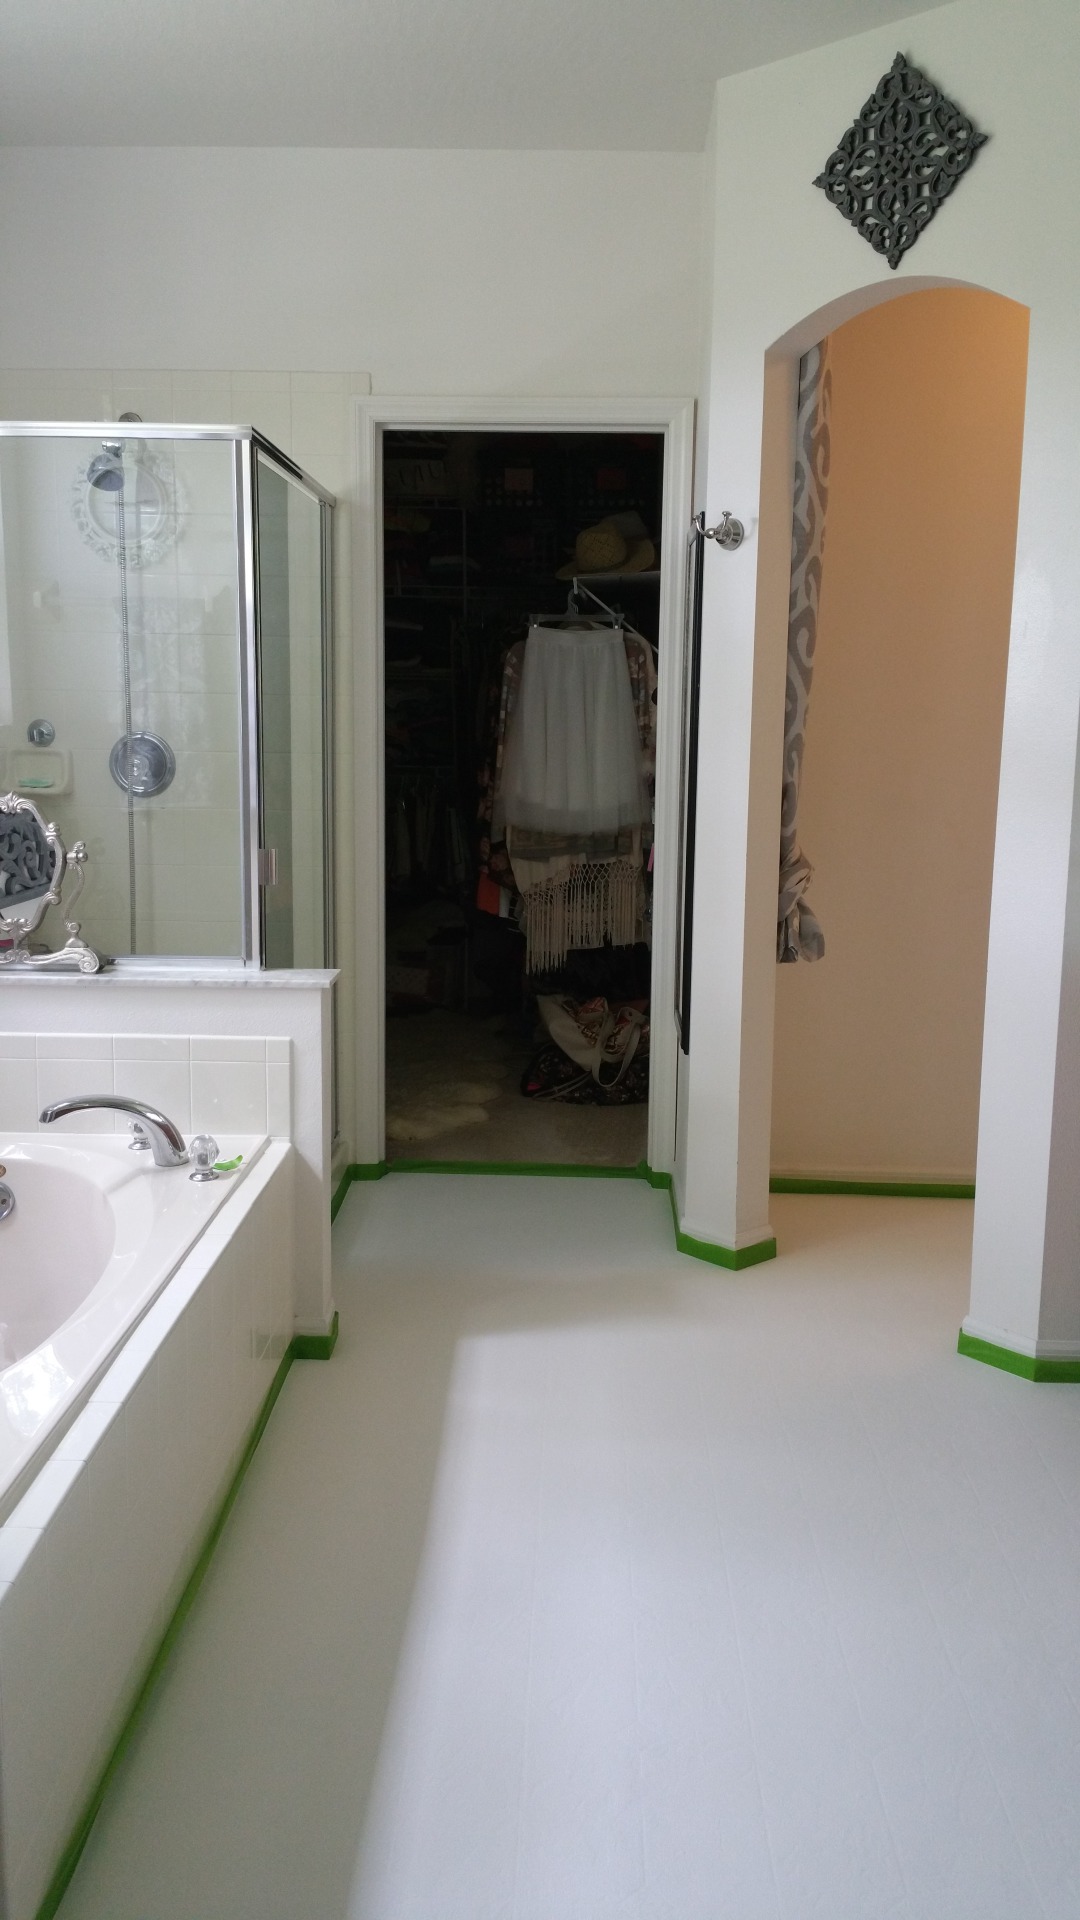
Here is the floor after the primer:
After your primer has dried for the appropriate time, it’s time to paint. You do this the exactly the same way that you did your primer. Edge, then dump and roll, painting your way out of the room.
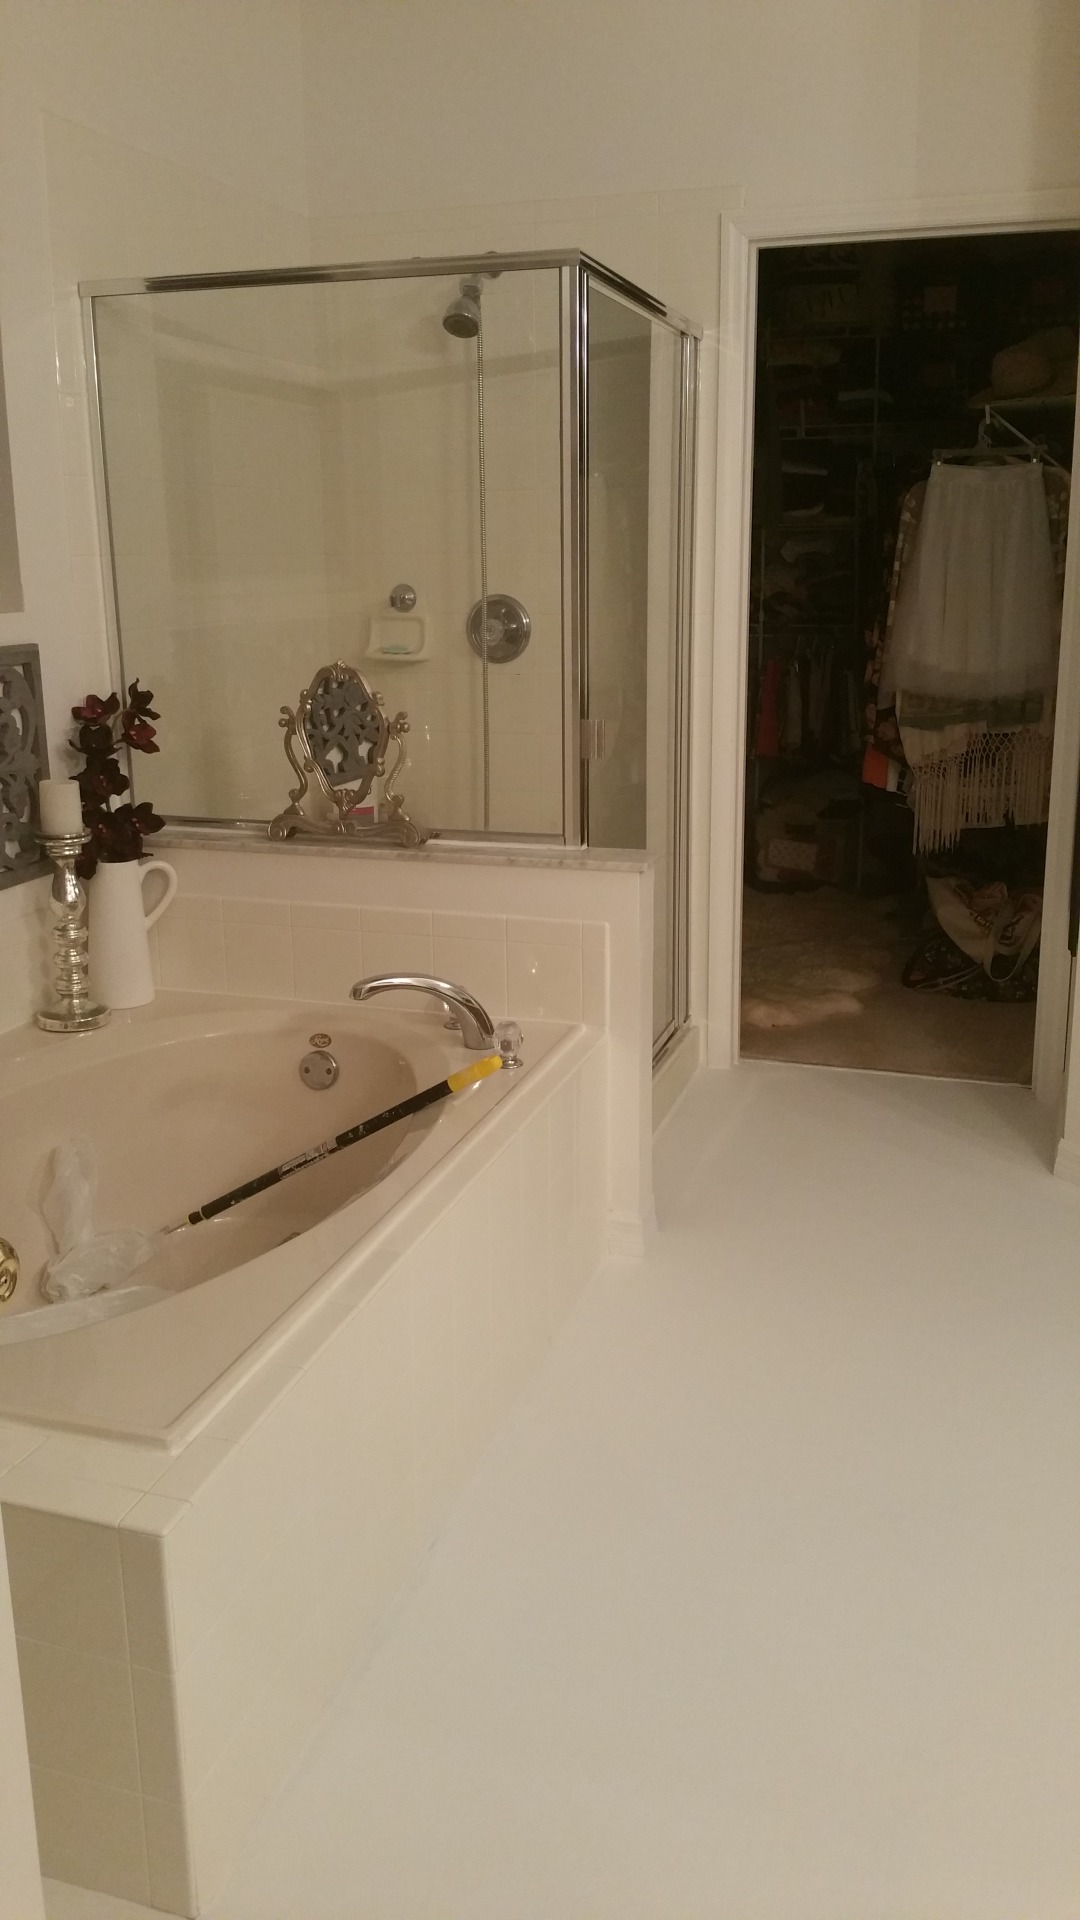
Here is the big reveal after you pull off the tape at 2AM because you can’t stand to wait any longer:
After about 24-48 hours it will be dry enough for you to walk across your floor again, but as with any paint, it takes a full 30 days to cure so walk carefully until then. In other words, no celebratory high heel bathroom dance parties until at least 30 days after painting.
Looks much better, right?! You would never know by just looking at it that it was painted. Of course it still vinyl so you won’t fool anyone into thinking it’s anything but vinyl, but that’s not the intention anyway. In doing this project, you will be able to postpone a major renovation and save hundreds of dollars while still majorly boosting your satisfaction level with your home. Win, win, win!
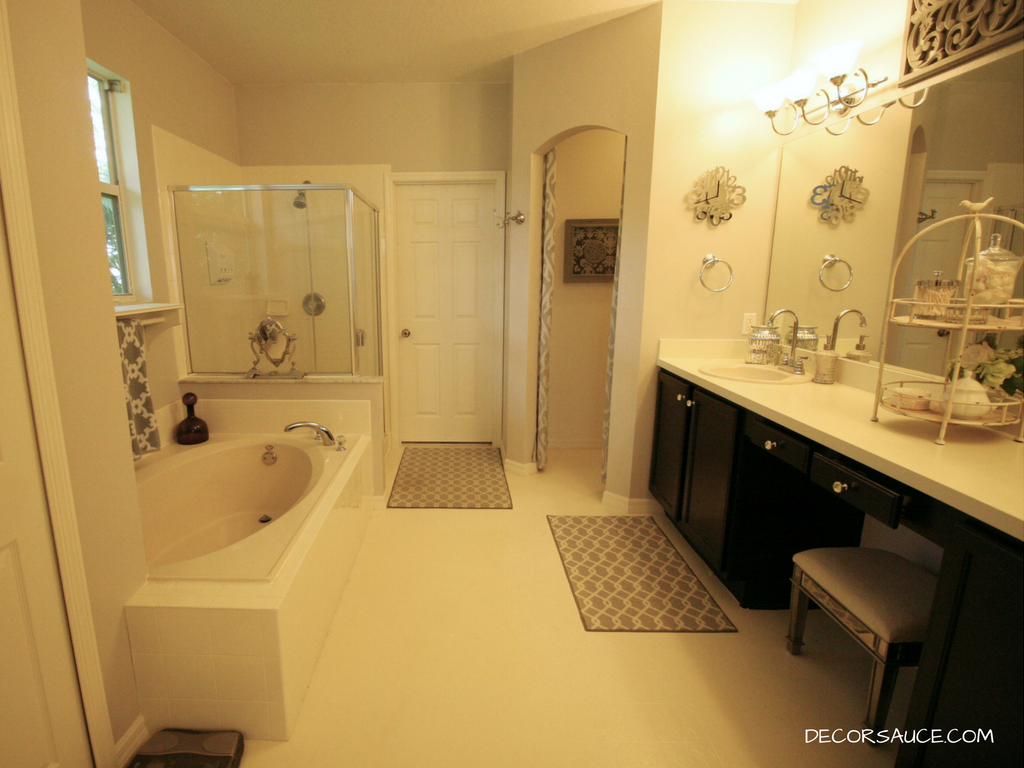
Below is a photo of the complete transformation after also painting the countertops with Rust-Oleum Countertop Cover and the cabinets with General Finishes Gel Stain in Java. In Part 2, I will give you a full tutorial on how to paint your countertops and information on how they are wearing after 14 months…
For part 2, click the link at the top of the page. Happy decorating!
In a perfect world, your biggest pig “issue” would be more like whether to order a BLT or pork medallions whilst on your getaway from all the noisy hammer banging that’s involved in constructing your grand master bathroom suite. But alas, that is not me.
In this two part tutorial I will show you how I transformed my master bathroom “pig” for under $500 with only paint, new light fixtures, new faucet fixtures, and knobs. Here is the before:
The major fixtures like the bathtub, shower, and sinks are all boring and underwhelming builder grade, but at least in good working condition. But that orange fake slate with grout (?) vinyl floor! And those orange counters! And that brown oak! Orange, orange, orange (and stark white, bleh!) with two 80’s light fixture strips to extra light it all up, in case you couldn’t see all the hideousness in the natural light.
So one day I woke up and decided that I was done looking at this smorgasbord of eyesores. I decided to paint that floor. Right that minute. Before deciding to paint or change anything else. This is not the way to do it, my friends. Here is the order in which you should update your entire bathroom with paint, should you plan ahead (like I was too carried away to do): 1. Ceiling 2. Walls and light fixtures 3. Cabinets 4. Countertop 5. Faucet fixtures 6. Floors.
For the sake of this tutorial however, I will give it to you like I did it as to not confuse my brain’s internal filing cabinet. Here is what you need to paint your floor:
- Power sander or sand paper and Superman arm muscles
- TSP substitute- Lowes or The Home Depot
- A bucket to mix the tsp substitute with water
- A stiff bristle brush and/or rags for cleaning
- 1 gallon of primer such as BIN or Zinsser (I used oil based)
- 1 gallon of porch and floor paint, I used Valspar oil based porch and floor paint in the color chowder, from Lowes
- Paint brush for edging
- Roller and sponge
Ok, first things first. As you can see by the above photo, I used my orbital sander to kind of “rough up” the gloss on this vinyl floor. You should know that it was not super glossy to start off with, and that may have positively effected it’s ability to really hold on to the paint. Also, it has a texture to it because it was made to look like slate. I just proceeded like I was painting a non-textured surface. I did this project 14 months ago and it has held up beautifully.
Next get it CLEAN. Fill up your bucket with your tsp and water according to the directions on the bottle, dunk your brush and scrub the floor like you’re going to perform surgery on it. Once you’re done, do it again. You cannot possibly get this floor too clean. Body oils, hairspray, and makeup build up over time and your paint will not stick if these things are present. If you have cleaned it 10 times but still feel a hairspray residue, you are not finished yet (and you may need a different product to help you out). I’m sorry to tell you, but this also means you must get closer to your toilet than you have since your 21st birthday. Especially if you have boys in the house.
After you are clean, you must prime. I used oil based primer and oil based paint. There’s a lot of mixed opinions out there on whether oil based is better or not, but like I mentioned before, it is holding up like a champ so I will endorse the performance of the oil based variety. If you’ve never painted a floor before you are in for a treat because it is easier than painting a wall. First, you “edge” all around the perimeter like you do a wall, then you dump the paint directly on the floor and roll it out towards the escape. Easy peasy!
NOTE: I can’t lie to you, oil based paint has a horrible suffocating odor that lasts long after you are walking on it, so I would take that into consideration if doing this near a child’s sleeping place. I, on the other hand, got cozy with the potentially cancer causing aroma since the bathroom is attached to my bedroom and I did not think of this beforehand.
I primed the floor twice. It may occur to you to place a fan near the floor to help the drying process along, as it did to me. DO NOT PLACE A FAN ON IT or you will succeed in blowing dirt, dust, and dog hair from the fan and the adjoining room into your fresh paint. Just leave it be and it will dry on its own like paint generally does. Carefully crawling on your freshly primed floor and picking out the crap that blew into it will seriously impede your progress on this project and will not cause you a fun time. On the bright side of things, 2 coats of primer are always better than one and as an unintended consequence, may have helped my floor in wearing so well.
Here is the floor after the primer:
After your primer has dried for the appropriate time, it’s time to paint. You do this the exactly the same way that you did your primer. Edge, then dump and roll, painting your way out of the room.
Here is the big reveal after you pull off the tape at 2AM because you can’t stand to wait any longer:
After about 24-48 hours it will be dry enough for you to walk across your floor again, but as with any paint, it takes a full 30 days to cure so walk carefully until then. In other words, no celebratory high heel bathroom dance parties until at least 30 days after painting.
Looks much better, right?! You would never know by just looking at it that it was painted. Of course it still vinyl so you won’t fool anyone into thinking it’s anything but vinyl, but that’s not the intention anyway. In doing this project, you will be able to postpone a major renovation and save hundreds of dollars while still majorly boosting your satisfaction level with your home. Win, win, win!
Below is a photo of the complete transformation after also painting the countertops with Rust-Oleum Countertop Cover and the cabinets with General Finishes Gel Stain in Java. In Part 2, I will give you a full tutorial on how to paint your countertops and information on how they are wearing after 14 months…
For part 2, click the link at the top of the page. Happy decorating!

Leave a Reply